And how to change tubeless tires on a motorcycle.
A couple of weeks ago, UPS dropped off a set of tires for John's FJR. That same weekend, John rode up and spent the night here, and we mounted up his new Pilot Road 2 tires.
The new tires on John's bike replaced a set of Dunlop Roadsmarts. He managed 8400 miles from his set. I had to replace the Roadsmarts on my FJR at only 6320 miles. I think we both hope the PR2's will provide a longer life. I usually get closer to 10 or 11,000 miles from a set of PR2's on the Ninja.
I also ordered a tire to replace the nearly new rear tire on the big Ninja. Last month, I had the misfortune of picking up a nail in it while out in Nevada. With another 2 week trip coming up, I didn't want the patch to fail and have a repeat of last months incident! No more bikes on their sides!
To prevent that from occurring, I used a ratchet strap to secure the center stand to front wheel. This will keep the bike from going forward and rolling off the center stand and taking a nap on it's side..... again.
After removing the cotter pin, castle nut and washer from the right side, the axle slips out from the left. With the wheel removed, it's time to assemble the Cyclehill tire changer.
The changer, a custom base that John had made up, and a wood box to keep the rims off the floor while breaking the beads, also made by John.
Assembled with truck parked on the base to keep things from moving around. The tire's been deflated, and ready to break the bead loose from one side...
After breaking the bead loose all the way around the wheel... on both sides, it's time to remove the tire.
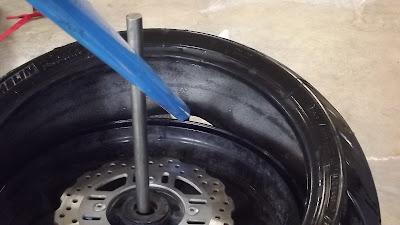
First, the wheel is clamped onto the changer, lube is applied to the tire near the wheel. The dismount end of the mount/dismount bar is placed inside the tire, catching the bead and prying up over the edge of the wheel. By pulling the mount/dismount bar around the steel post in the center of the wheel, the tire comes off quite easily. The process is repeated again to get the other side of the tire off.
With the old tire off, it's a good time to clean up the wheel.
To mount the new tire, some lube is applied to the bottom side of the tire and the top of the rim... The first side of the tire is easily pushed on by hand. Be sure to pay attention to the direction arrow on the side of the tire...
Getting the second bead of the tire over the edge of the rim is a little more work. About 1/2 of the tire can be pushed on by hand, but the mount/dismount bar must be used to finish the job. A little more lube, and a little technique..... and it's on. If it's going hard.. you're doing it wrong...
With the tire mounted and aired up, it's time to balance it. The heavy side of the wheel settles to the bottom. I marked the light spot with a bit of blue tape...
I use old weights taped to the rim to determine how much weight to add, and then replace them with new, self adhesive weights once I figure out how much to add. The wheel is "balanced" when it will stay in any position without rotating.
Put the wheel back on the bike, adjust the chain.... Done!
I spent some time cleaning off the road grime from the Nevada trip. I think the rash on the right side looked worse the day it fell over. It really isn't as bad as I thought. I'm not going to replace the plastic... If anyone notices the rash, the explanation will make a good story.
All cleaned up and ready for a trip to South Dakota and Montana!
Friday, July 26, 2013
Subscribe to:
Post Comments (Atom)


Bike's looking great Erik! PR2's are my favourite on the Connie.
ReplyDeleteI'd love to have your tyre changing gear - it costs around $90-100 for fitting every time I replace a set...
The $$$$ were the reason John and I went in together on the changer kit! I know I've paid for my 1/2 in savings!
DeleteI zeroed in like a laser on those "made by John" tire changing items and knew right away that they didn't come in the box with the blue parts; very nice additions and great ideas!
ReplyDeleteHave fun out there under the Big Sky :)
We saw a similar changer base at the CycleWorld cycle show, but thought we could do it for less $. I didn't want to drill into the floor out of fear for hitting a piece of the in-floor heat plumbing.
DeleteThe box came about as a result of having to prop up the wheels to keep the rotors and sprockets off the garage floor. It also put the handle at a much better angle..
John is very handy!
Oooh another trip. Sounds like fun. Will be watching for the write-ups and pictures.
ReplyDelete